Bi-wiring requires speakers with dual binding posts—separate positive and negative terminals for low and high frequencies—allowing independent wiring by removing metal jumpers. Use two identical 8-gauge cables, connecting one set from the amplifier to low-frequency terminals and the other to mid/high terminals, optimizing signal integrity by reducing electromagnetic interference and resistance in treble paths. This approach enhances sound clarity and imaging without altering crossover design. Further exploration reveals detailed connection procedures and performance assessments.
Key Takeaways
- Identify speakers with dual binding posts and remove metal jumpers linking bass and mid/high terminals.
- Use two identical speaker cable sets to connect amplifier outputs separately to low-frequency and high-frequency inputs.
- Connect one cable set to the bass driver terminals and the other to the midrange/treble terminals on the speaker.
- Ensure cable gauge and length match for both sets to maintain consistent electrical characteristics and sound quality.
- Secure all connections tightly, verifying no shorts or debris, and perform listening tests to confirm improved clarity and separation.
Determining Speaker Compatibility for Bi-Wiring
Determining whether a speaker is compatible for bi-wiring requires a thorough examination of its terminal configuration and manufacturer documentation. Speakers designed for bi wiring feature two distinct sets of binding posts on the back panel, typically segregated for bass and mid/high frequencies, enabling isolated signal paths. These speaker terminals often include removable jumpers linking the positive and negative pairs, facilitating standard wiring before bi-wiring is implemented. Compatibility is confirmed when separate positive and negative terminals exist for low and high frequency drivers, reducing intermodulation distortion and enhancing clarity. Manufacturer specifications or user manuals usually specify bi-wiring capability, with many models from reputable brands explicitly indicating dual connection provisions. Conversely, speakers possessing only a single pair of speaker terminals lack the necessary hardware for bi wiring, making them unsuitable for such configurations.
Understanding the Concept of Bi-Wiring

Bi-wiring employs separate cables connected to a speaker’s dual binding posts, isolating bass and mid/high frequency terminals to reduce electromagnetic interference and preserve signal integrity. The internal crossover network directs frequencies appropriately, ensuring that bass drivers and treble drivers receive distinct signals, which can minimize modulation effects and improve acoustic clarity. This separation, combined with matched cable quality, offers potential enhancements in sound resolution and detail by maintaining electrical independence between frequency sections.
Speaker Terminal Separation
Separating speaker terminals into distinct pairs designated for low-frequency and mid/high-frequency drivers enables a more precise signal distribution, which reduces electromagnetic interference between frequency bands and enhances overall sound fidelity. Speakers designed for bi-wiring feature two pairs of binding posts, typically linked by removable jumper cables. Removing these jumpers isolates the terminals, allowing separate cables to carry signals to the high and low frequency drivers independently. This separation directs bass frequencies to the low-frequency binding posts and treble/midrange frequencies to the high-frequency posts, minimizing magnetic interference and improving clarity. Ideal bi-wiring requires identical cable specifications—length, gauge, and material—for both terminal pairs to maintain consistent impedance and phase characteristics. Such attention to terminal separation supports improved audio resolution and a cleaner signal path, offering measurable benefits over single-wired configurations.
Crossover Functionality Role
The internal crossover network within a speaker system functions as a frequency divider, allocating the full-range audio signal into discrete bands that are routed respectively to low-frequency bass drivers and mid/high-frequency tweeters. Bi-wiring makes use of this separation by employing a biwire speaker cable to connect independently to the crossover’s low- and high-frequency terminals. This configuration reduces electromagnetic interference caused by the bass driver’s magnetic fields, which can otherwise modulate and degrade the mid/high frequency signals. By bi-wiring your speakers, the crossover benefits from lowered resistance in high-frequency paths, promoting clearer transmission of treble and midrange details. Consequently, bi-wiring supports the crossover’s role in maintaining distinct signal paths, optimizing frequency separation, and enhancing overall sound resolution without altering the crossover design itself.
Benefits of Bi-Wiring
An effective approach to speaker cable configuration involves using separate conductors for low-frequency bass drivers and mid/high-frequency tweeters, which mitigates electromagnetic interference generated by the bass driver’s magnetic fields. Biwire cable implementation reduces resistance for higher frequency signals, enabling cleaner transmission and improved sonic performance in mid and treble ranges. This separation minimizes signal modulation effects, resulting in enhanced audio detail and customized sonic signatures across various speaker setups. User evaluations, including those with shotgun bi-wire cables, report an audible difference characterized by tighter bass response and improved imaging when replacing standard jumpers. Compared to bi-amping, bi-wiring offers a cost-effective upgrade by enhancing clarity and resolution without requiring additional amplifiers, making it a practical choice for audiophiles seeking measurable improvements in sound quality.
Benefits of Bi-Wiring Your Speakers
Bi-wiring speaker cables involves utilizing separate conductors to connect the low-frequency (bass) and high-frequency (midrange and treble) drivers, which reduces magnetic interference originating from the bass driver that can otherwise modulate higher frequencies. This separation achieved by bi-wired cables minimizes resistance and signal distortion in the high-frequency pathways, enhancing resolution and detail during audio playback. Users frequently report a noticeable difference in sonic clarity, imaging, and reduced mid/high signal modulation compared to single wiring. Additionally, bi-wiring facilitates customized sound signatures by enabling distinct connections for frequency drivers, aligning with manufacturer recommendations for speakers equipped with dual terminals. Testing with quality bi-wired cables, such as Audioquest PSC BiWire Jumpers, confirms these benefits, often delivering the best sonic performance depending on speaker design and cable quality, making bi-wiring a viable upgrade for audiophiles seeking improved sound fidelity.
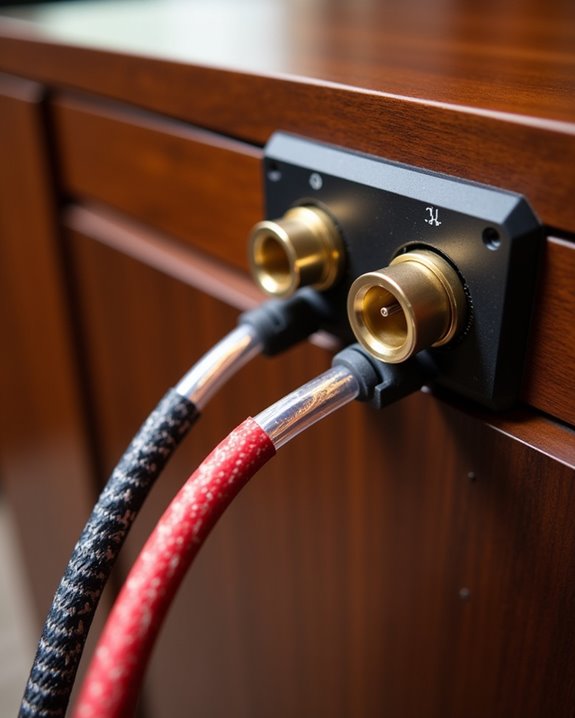
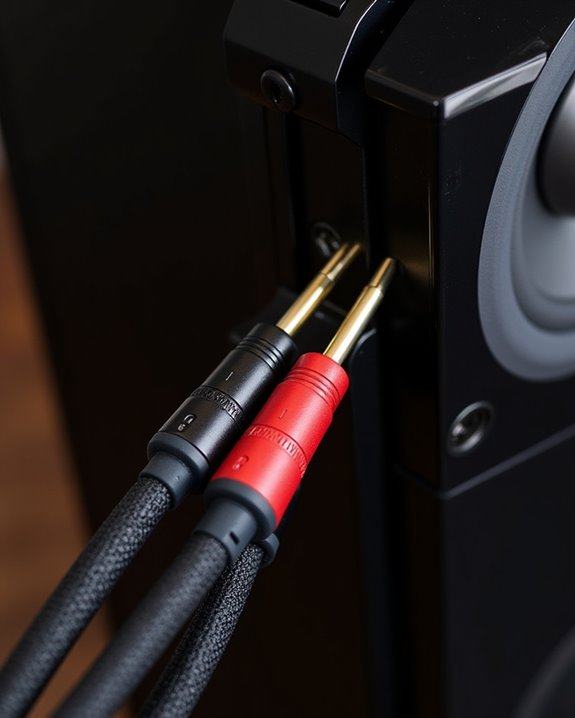
Identifying Speaker Terminals and Removing Jumpers
The initial step involves locating two distinct pairs of speaker terminals, typically marked positive (+) and negative (–), which confirm bi-wiring compatibility compared to a single terminal pair found on standard speakers. Factory-installed jumpers, usually made of conductive metals like bronze, bridge these terminals to maintain a single-wire connection and must be carefully removed to enable separate wiring for bass and treble drivers. Ensuring the removal of these jumpers and verifying that no terminals are shorted is critical for optimizing signal integrity and preventing amplifier damage during the bi-wiring process. Additionally, understanding the hardwire features of certain speakers can help ensure secure and reliable connections for your setup.
Locate Speaker Terminals
Two distinct sets of binding posts on the rear panel indicate bi-wiring capability, featuring separate positive and negative terminals for bass and mid/high frequency drivers. To locate these speaker terminals, inspect the back panel for two pairs of binding posts, each clearly labeled for low and high binding frequencies. This dual-terminal design supports a clean signal path when set up for bi-wiring, reducing interference between frequency ranges. Additionally, examine the terminals for metal jumpers—small straps connecting positive and negative posts across sets—which must be removed to enable proper bi-wire configuration. Use a small tool to carefully detach these jumpers, ensuring no residual connections remain. Confirming jumper removal is essential to prevent electrical bridging, thereby enhancing audio clarity and preserving the integrity of separate wiring paths in bi-wired speaker systems.
Detect Jumper Presence
Inspecting speaker terminals for metal jumpers is a necessary step after locating dual binding posts designed for separate low and high frequency connections. These jumpers, typically bronze or metal straps, bridge the two sets of terminals—positive and negative—for each frequency range, ensuring signal continuity with standard speaker wires and speaker cables. Detecting these conductive links involves examining the back of the speaker for small metal bars connecting the terminals. Their presence confirms bi-wiring capability but requires removal to fully isolate the pathways. Identification is achieved by visual inspection and testing for electrical continuity between the terminals. Properly detecting jumpers allows users to prepare the speaker terminals for bi-wiring, facilitating improved signal clarity and reducing interference. This step is essential before proceeding to disconnect these factory-installed jumpers for optimized audio performance.
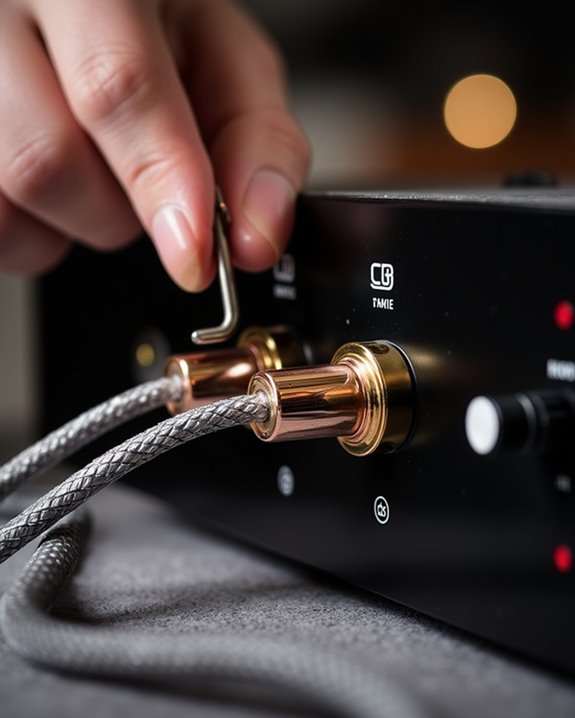
Remove Factory Jumpers
Begin by accurately identifying the speaker terminals, which typically consist of two distinct sets of binding posts labeled for high-frequency (tweeter) and low-frequency (woofer) inputs, connected by factory-installed metal jumpers designed to bridge positive and negative terminals within each frequency group. These jumpers, often metal straps or wires, maintain single-wire functionality but must be removed to enable true bi-wiring. Carefully unscrew or unhook the jumpers without damaging the terminals or causing positive and negative contacts to touch. After removal, inspect the terminals to verify they are clean and free from debris, optimizing contact for banana and spade connectors on wire cables. This separation allows individual cables to carry distinct frequency signals, improving audio clarity and reducing interference, essential for high-fidelity speaker performance in bi-wire capable systems.
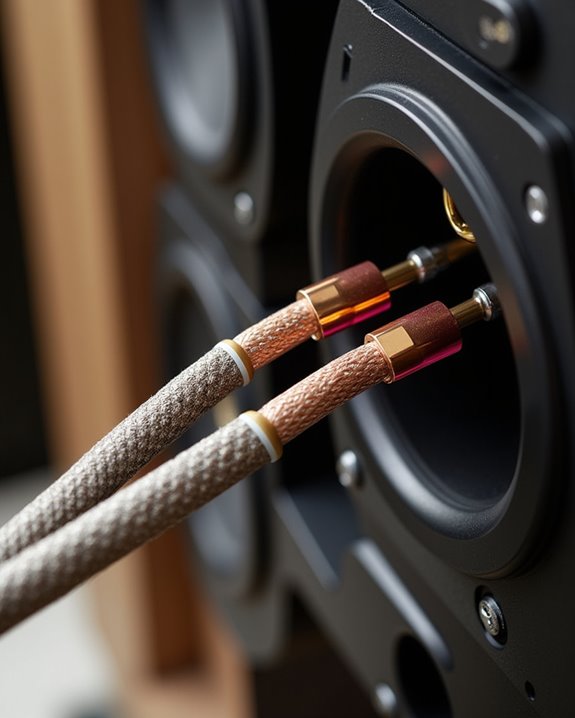
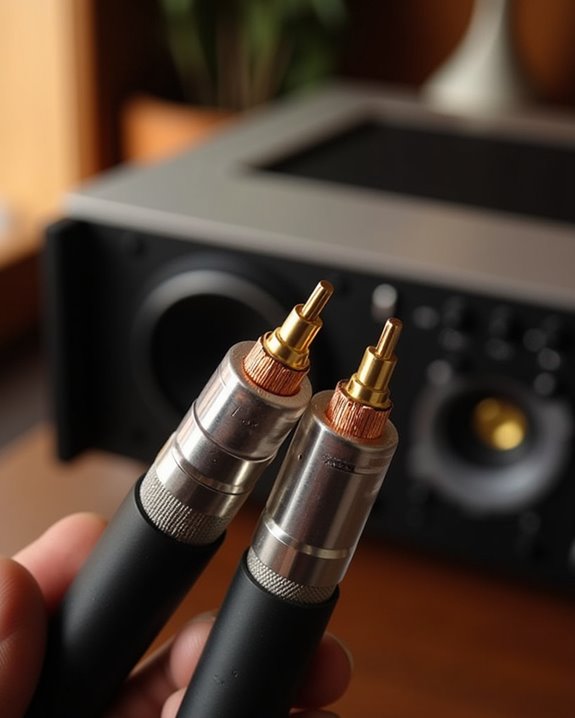
Selecting Appropriate Bi-Wire Speaker Cables
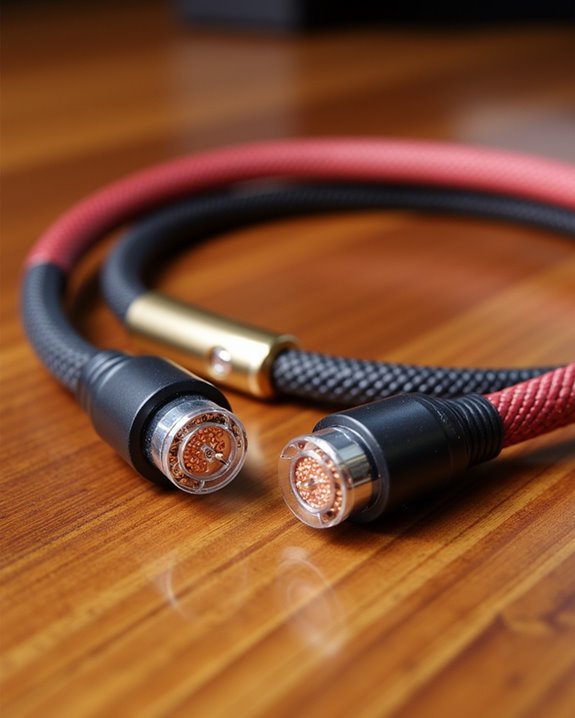
Selecting appropriate bi-wire speaker cables requires careful consideration of several technical factors to achieve ideal audio performance and system compatibility. A recommended approach involves choosing two sets of cables identical in brand, model, and length to maintain consistent electrical properties and minimize signal degradation. The gauge of the cable is critical; for jumpers, an 8-gauge equivalent is ideal to handle bass and treble driver currents efficiently without excessive resistance. Externally bi-wired cables with physically separated conductors, such as shotgun designs, reduce magnetic interference, enhancing clarity. Cables marked with distinct high-pass and low-pass pairs, utilizing thinner wires for high frequencies, exploit the skin effect for better midrange and treble resolution. Reputable options like Audioquest PSC BiWire or Norse Series Bi-Wire Jumpers meet these criteria, balancing quality and cost effectively.
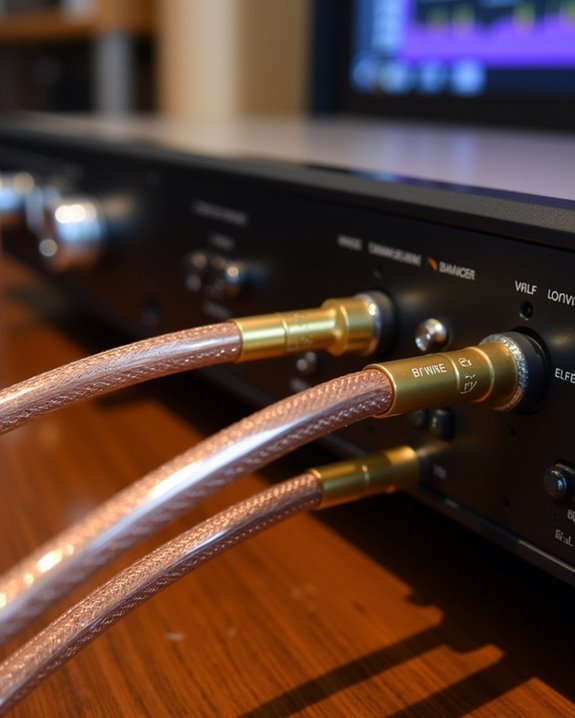
Step-by-Step Bi-Wiring Connection Procedure
A precise four-step procedure is essential for achieving ideal bi-wiring connections, ensuring distinct signal pathways for bass and midrange/treble drivers. First, remove the jumpers from the speaker’s positive and negative terminals to isolate these sections, preventing signal interference. Next, use two sets of identical speaker cables, making sure they are the same brand, model, and length to maintain electrical consistency. Then, connect one set of cables from the amplifier’s positive and negative terminals to the speaker’s bass driver terminals. Finally, use the second set to connect the amplifier’s corresponding terminals to the midrange and treble driver terminals. Make sure all connections are secure and insulated, verifying that no positive and negative terminals touch, thereby protecting the amplifier from short circuits and ensuring best audio performance.
Testing Sound Differences After Bi-Wiring
When evaluating the impact of bi-wiring on audio performance, rigorous A/B testing between single-wired and bi-wired configurations is essential for discerning improvements in clarity, resolution, and signal separation. Systematic comparisons involve switching cables while listening to well-recorded tracks, enabling identification of subtle differences such as reduced modulation of mid/high frequencies. Some users report a clear, audible difference with enhanced detail and clarity, particularly when using high-quality cables or upgraded jumpers. Conversely, others find bi-wiring makes no difference, likely due to variables like speaker age, cable quality, or system design. Personal auditory evaluation remains critical, as improvements often depend on individual setup nuances. Thus, testing should be methodical and unbiased to accurately assess whether bi-wiring delivers measurable sound enhancements or negligible change.
Overview of Bi-Amping as an Extension of Bi-Wiring
Building upon the concept of bi-wiring, bi-amping employs separate amplification channels dedicated to the speaker’s low-frequency (bass) and mid/high-frequency drivers, utilizing dual input terminals to deliver enhanced power distribution and improved signal isolation. This configuration involves connecting interconnects from distinct amplifiers at the amplifier end to the corresponding speaker terminals, allowing each amplifier to pass current independently to its designated driver. In passive bi-amping, the speaker’s internal crossover manages frequency division, necessitating amplifiers with matched input sensitivity and output impedance for balanced output. Active bi-amping incorporates an electronic crossover before amplification, enabling precise frequency control and optimization of amplifier strengths. This approach reduces distortion risks linked to underpowered amps and enhances dynamic response. Additionally, when selecting amplifiers for bi-amping, considering amplifier matching is essential to ensure optimal performance. While bi-amping elevates performance beyond bi-wiring, prioritizing amplifier quality remains critical for best results.
Recommendations for Optimal Speaker Performance

Ideal speaker performance in bi-wiring systems depends greatly on the consistency and quality of the speaker cables used, as well as the proper preparation of the speaker terminals. For DIY AUDIO enthusiasts seeking bang for the buck, using two sets of identical cables—same brand, model, and length—ensures uniform electrical characteristics and limits interference. Removing factory jumpers separates bass from mid/high drivers, reducing magnetic interference and enhancing clarity. Replacing stock jumpers with high-quality alternatives, such as Audioquest PSC BiWire Jumpers, offers measurable improvements in bass tightness and imaging at low cost. Objective A/B testing confirms bi-wiring delivers superior resolution using a single high-quality amplifier compared to bi-amping with multiple lesser units. Additionally, selecting active PA systems with adequate power ratings and connectivity options can further improve overall sound clarity and performance. These recommendations optimize performance while maintaining cost efficiency for audiophiles pursuing precise sound reproduction.
Frequently Asked Questions
How to Wire Bi-Wire Speakers?
Bi-wire speaker wiring begins with jumpers removal to separate frequency sections. Gauge selection guarantees ideal current flow, while insulation types prevent interference. Together, these steps invite users into a community valuing precise, shared audio enhancement.
Does Bi-Wiring a Speaker Make a Difference?
Bi-wiring speakers may influence sound quality, though audio benefits often vary by system specifics. Perception effects play a role, making it essential for enthusiasts to personally evaluate results, fostering shared understanding within the audio community.
Can You Bi-Amp a Speaker With One Set of Terminals?
Bi-amping benefits begin by bridging bass and treble, but bi-amp safety signals caution: single terminals lack terminal alternatives and amplifier compatibility, suggesting unity in user choice and encouraging embracing speakers designed for dual connections to belong safely.
What Is the Best Way to Couple Speaker Wires?
The best way to couple speaker wires involves careful wire twisting for secure contact, selecting appropriate connector types compatible with terminals, and precise insulation stripping to avoid shorts. This fosters reliable connections and a shared commitment to quality sound.